
Category: Discord Bot Tutorials
Discord Bot Tutorial#7Getting User Input with a Modal (Python Example)
 Author: Mojangcam
This post was translated from the Korean original.
Contents8 sections
📌 Previous part in the series: Discord Bot Tutorial #6 - Implementing a Dropdown (Select Menu)
Hi there! This is Mojangcam 😎
Last time, we learned how to neatly fit multiple choices into a dropdown (Select Menu), right? But buttons and dropdowns both make users pick from preset choices. So what do you do when users need to type their own text freely?
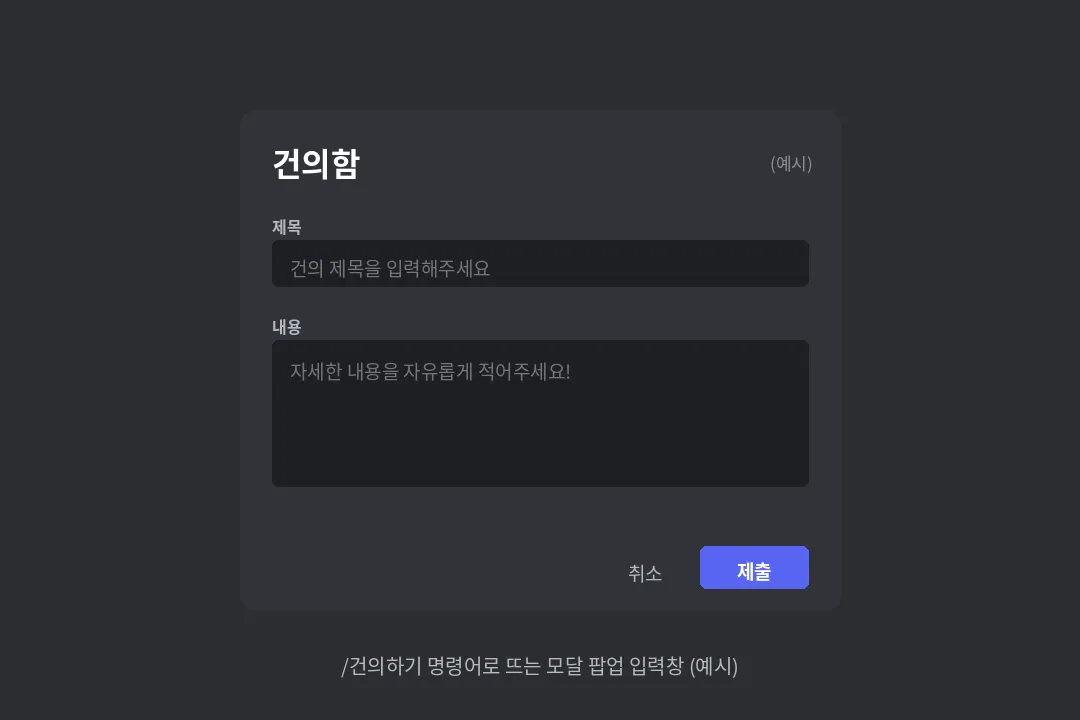
This time, we're going to build a Modal that does exactly that! A modal is a popup input form that appears in the middle of the screen when a user runs a command. It's used almost anywhere "the user has to type something themselves": support requests, suggestion boxes, nickname registration, report forms, and more. It's much cleaner than making people type long messages in the chat, and you can collect several fields at once!
📌 What You Need
- Python 3.8 or later
- discord.py latest 2.x version (Modals are supported starting from 2.0)
- A bot token + the bot already invited to your server (see Part 1 of the series)
pip install -U discord.pyHere's how to check your version:
pip show discord.pyIf it shows something like Version: 2.x (2.x or later), you're good! Modals are a feature supported starting from discord.py 2.0, so they won't work on 1.x.
📌 Step 1 - Creating the Modal Class
The core of a modal is the discord.ui.Modal class. You subclass it, define the input fields (TextInput), and write what happens when the user submits it (on_submit).
import discord
from discord.ext import commands

class SuggestModal(discord.ui.Modal, title="Suggestion Box 📮"):
    # Short single-line input field
    subject = discord.ui.TextInput(
        label="Subject",
        placeholder="Enter a title for your suggestion",
        max_length=50,
    )

    # Long multi-line input field
    content = discord.ui.TextInput(
        label="Details",
        style=discord.TextStyle.long,
        placeholder="Feel free to write out all the details!",
        required=True,
        max_length=500,
    )

    async def on_submit(self, interaction: discord.Interaction):
        await interaction.response.send_message(
            f"✅ Your suggestion has been received!\n**Subject:** {self.subject.value}\n**Details:** {self.content.value}",
            ephemeral=True,
        )
Let's break it down piece by piece 💡
- title : the big title shown at the very top of the modal popup. You pass it when defining the class, like
discord.ui.Modal, title="...". - TextInput : a single actual input field. When you declare them as class variables, they show up on screen in order from top to bottom. (You can put up to 5 in one modal.)
- label : the name tag shown above the input field.
- style : you can choose
discord.TextStyle.short(default, single line) ordiscord.TextStyle.long(multiple lines). - placeholder : the gray hint text shown when nothing has been typed yet.
- required / max_length : whether the field is required, and the maximum number of characters. With
required=False, the form can be submitted with the field left empty. - on_submit : the function that runs when the user presses the "Submit" button. You get the entered value with
self.입력칸이름.value, where the middle part is the name of your input field.
💡 Here, ephemeral=True is the option to reply with a "message only you can see". It's perfect for replies that shouldn't be visible to others, like suggestions or reports!
📌 Step 2 - Opening the Modal with a Slash Command
Buttons and dropdowns were sent inside a View, but modals don't need a View! Instead, you open them directly with interaction.response.send_modal().
intents = discord.Intents.default()
bot = commands.Bot(command_prefix="!", intents=intents)

@bot.event
async def on_ready():
    await bot.tree.sync()
    print(f"✅ {bot.user} logged in!")

@bot.tree.command(name="건의하기", description="Leave a suggestion for the server!")
async def suggest(interaction: discord.Interaction):
    await interaction.response.send_modal(SuggestModal())
The key point is that send_modal() has to be the first response. Once you've already responded with something like interaction.response.send_message(), you can't open a modal anymore. That's why you usually open the modal right away as soon as the slash command is used.
📌 Step 3 - Adding Error Handling (Optional)
Adding on_error makes things safer in case something goes wrong while the modal is being submitted.
async def on_error(self, interaction: discord.Interaction, error: Exception):
    await interaction.response.send_message(
        "⚠️ Something went wrong while processing. Please try again in a moment.", ephemeral=True
    )
    print(error)
Just put this function inside the SuggestModal class above, below on_submit, at the same indentation level.
📌 Full Code (Copy-Paste OK)
# discord.py 2.x / Python 3.8+
import discord
from discord.ext import commands

class SuggestModal(discord.ui.Modal, title="Suggestion Box 📮"):
    subject = discord.ui.TextInput(
        label="Subject",
        placeholder="Enter a title for your suggestion",
        max_length=50,
    )
    content = discord.ui.TextInput(
        label="Details",
        style=discord.TextStyle.long,
        placeholder="Feel free to write out all the details!",
        required=True,
        max_length=500,
    )

    async def on_submit(self, interaction: discord.Interaction):
        await interaction.response.send_message(
            f"✅ Your suggestion has been received!\n**Subject:** {self.subject.value}\n**Details:** {self.content.value}",
            ephemeral=True,
        )

    async def on_error(self, interaction: discord.Interaction, error: Exception):
        await interaction.response.send_message(
            "⚠️ Something went wrong while processing. Please try again in a moment.", ephemeral=True
        )
        print(error)

intents = discord.Intents.default()
bot = commands.Bot(command_prefix="!", intents=intents)

@bot.event
async def on_ready():
    await bot.tree.sync()
    print(f"✅ {bot.user} logged in!")

@bot.tree.command(name="건의하기", description="Leave a suggestion for the server!")
async def suggest(interaction: discord.Interaction):
    await interaction.response.send_modal(SuggestModal())

bot.run("YOUR_BOT_TOKEN")
📌 Result
When you type /건의하기 (suggest), a "Suggestion Box" popup appears in the middle of the screen with two fields: Subject and Details. Fill them in and press Submit, and you'll get a "Your suggestion has been received!" message that only you can see.

💡 Bonus: if you want to send the submitted content to an admin channel, find that channel inside on_submit and send it as an embed. That gives you a real "suggestion box bot"!
async def on_submit(self, interaction: discord.Interaction):
    log_channel = interaction.guild.get_channel(관리자채널_ID)
    embed = discord.Embed(title=f"📮 New suggestion: {self.subject.value}", description=self.content.value)
    embed.set_footer(text=f"From: {interaction.user}")
    await log_channel.send(embed=embed)
    await interaction.response.send_message("✅ Your suggestion has been received!", ephemeral=True)
📌 Common Errors
1. InteractionResponded: This interaction has already been responded to
You get this error when you call send_modal() on an interaction that has already been responded to. A modal must always be opened as the first response. Once you've sent a different response, for example in a button callback, you can't open a modal.
2. The modal won't show up because it has 6 or more input fields
A single modal can only hold up to 5 TextInput fields. If you need to collect more, split the content and design it as multiple steps.
3. AttributeError: 'str' object has no attribute 'value'
When reading an input value, you have to add .value, like self.subject.value instead of self.subject, to get the actual text. If you forget .value, you get the TextInput object itself.
📌 Wrapping Up
Today we learned how to get text input directly from users with a Modal! Going from buttons → dropdowns → modals, we've now covered almost all of Discord's interactive UI 🙌 In the next part, we'll cover how to make embeds look great by adding images and fields. Stay tuned!
📚 Discord Bot Tutorial Series #4 Sending Embeds with Slash Commands #5 Implementing Button Interactions #6 Implementing a Dropdown (Select Menu) #7 Getting User Input with a Modal ← You are here!
Series · Part 7 of 32
Discord Bot Tutorial
- #1Discord Bot Tutorial - Mastering Slash Commands!
- #2Adding Options (Arguments) to Slash Commands!
- #3Adding Subcommands to Slash Commands!
- #4Sending Embeds with Slash Commands!
- #5Implementing Button Interactions!
- #6Implementing a Dropdown (Select Menu)!
- #7Getting User Input with a Modal (Python Example)You are here
- #8Styling Embeds with Images and Fields (Python Example)
- #9Connecting AI (Claude & ChatGPT API) to Your Bot! (Python Example)
- #10Adding Multi-Language (i18n) Support! (Python Example)
- #11Building a Web Dashboard with Flask! (Python Example)
- #12Managing Command Cooldowns and Permissions! (Python Example)
- #13Automating Roles and Channels to Manage Your Server! (Python Example)
- #14Saving Data! JSON vs SQLite (Python Example)
- #15슬래시 명령어 그룹(Group)으로 명령어 정리하기! (파이썬 예제) (Korean)
- #16리마인더·알림 기능 만들기! 봇이 먼저 말 걸게 하기 (파이썬 예제) (Korean)
- #17RAG로 문서 기반 답변봇 만들기! 우리 서버 전용 FAQ 봇 (파이썬 예제) (Korean)
- #18투표(Poll) 기능 만들기! 다수결로 정하는 서버 규칙 (파이썬 예제) (Korean)
- #19Cog로 코드 쪼개기! 1000줄 봇도 안 더러워지는 구조 (파이썬 예제) (Korean)
- #20자동 환영 메시지·온보딩 만들기! 규칙 동의 버튼으로 자동 역할 부여 (파이썬 예제) (Korean)
- #21키워드 자동응답·금지어 필터 만들기! 경고 누적으로 자동 제재까지 (파이썬 예제) (Korean)
- #22슬래시 명령어 자동완성(Autocomplete) 만들기! 금지어를 골라서 추가·삭제 (파이썬 예제) (Korean)
- #23aiosqlite로 비동기 DB 제대로 설계하기! JSON 탈출 (파이썬 예제) (Korean)
- #24채널 난독화(Channel Obfuscation) 대응하기! 11/16부터 안 보이는 채널이 생겨요 (파이썬 예제) (Korean)
- #25봇이 죽지 않게! 에러 핸들링·로깅 체계 잡기 (파이썬 예제) (Korean)
- #26티켓(Ticket) 문의 시스템 만들기! 버튼 하나로 1:1 상담 채널 자동 생성 (파이썬 예제) (Korean)
- #27티켓 담당자 배정·우선순위 만들기! 스태프가 여러 명이어도 안 꼬이게 (파이썬 예제) (Korean)
- #28레벨·경험치(XP) 시스템 만들기! 채팅할수록 레벨업, 랭킹판까지 (파이썬 예제) (Korean)
- #29화폐·상점(Economy) 시스템 만들기! 코인 벌어서 아이템 사기 (파이썬 예제) (Korean)
- #30Build a Poll & Survey Bot! Native Polls + Buttons with Real-Time Tallies (Python Example) 🗳️
- #32Build a Server Log & Audit Log Channel! Auto-Log Message Deletes, Edits, Joins/Leaves, and Kicks (Python Example) 🕵️
- #33임시 음성방 확장, 파티방 만들기! 방장 위임·강퇴·초대 전용(비공개) 방 + 전용 채팅방 자동 생성 (파이썬 예제) 🎉 (Korean)
Show all 32Collapse
