
Category: Discord Bot Tutorials
Discord Bot Tutorial#11Building a Web Dashboard with Flask! (Python Example)
 Author: Mojangcam
This post was translated from the Korean original.
Contents10 sections
Hi there! This is Mojangcam 😎
In Part #10, we turned our bot into a global bot with multi-language (i18n) support, right? I originally promised cooldowns and permission management next, but first I brought a topic a lot of you have been curious about. It's building a web dashboard! (The cooldown part is coming soon too, so stay tuned)
Once your bot is running on a server, you start wondering: "Is my bot still alive...?" Instead of opening Discord every time to check, wouldn't it be much easier to have a page where you just type an address into your browser and see the bot's status, server count, and ping at a glance? Today we'll build that kind of mini control tower with Flask, a Python web framework.
🧠 Why Flask?
Flask is the most famous micro web framework in Python. True to the "micro" name, a few lines of code are all it takes to spin up a web server, which makes it perfect for a dashboard that sits alongside your bot.
- See whether the bot is on right from your browser (even on your phone!)
- Monitor server count, user count, and response time in real time
- Extend it endlessly later with command stats, a log viewer, and more
There's just one concept you need to know. discord.py is a program that runs asynchronously (asyncio), while Flask is a synchronous web server. To run both in one file, you need a trick: running Flask in a separate thread. Today we'll learn exactly how to do that!
📌 What You Need
- Python 3.9 or later (Flask 3.1 requires 3.9+)
- discord.py 2.x (this post is based on 2.7.1)
- Flask 3.1.x (this post is based on 3.1.3)
- A bot token + a test server your bot has been invited to (see Part #1)
pip install -U discord.py flask📌 Step 1 - Running a Flask Server on Its Own
Before combining it with the bot, let's get a feel for what Flask looks like with a minimal 5-line example.
from flask import Flask

app = Flask(__name__)

@app.route("/")
def home():
    return "The bot dashboard is getting ready!"

app.run(host="0.0.0.0", port=5000)
Let's break it down 💡
Flask(__name__): Creates the web app object.__name__means "this file is the app's reference point."@app.route("/"): A marker that says "run the function below when the browser visits the/address (the main page)." It works just like the decorator for slash commands, right?host="0.0.0.0": Allows connections not only from your own computer but also from other devices (like your phone) on the same network. If you're the only one looking at it, you can change it to127.0.0.1.port=5000: The address you connect to becomeshttp://localhost:5000.
Run it and open http://localhost:5000 in your browser, and you'll see the message. Once you've checked it, stop it with Ctrl+C and move on to the next step!
📌 Step 2 - Running the Bot and Flask Together in One File
This is the key part of today's post. bot.run() and app.run() are both functions that grab hold of the whole program (blocking), so if you just write them one after the other, only one of them runs. The solution is to split Flask off into a daemon thread.
import threading

def run_flask():
    app.run(host="0.0.0.0", port=5000, use_reloader=False)

threading.Thread(target=run_flask, daemon=True).start()  # Flask runs in a separate thread
bot.run("Put your bot token here")  # The bot runs in the main thread
Let's break it down 💡
threading.Thread(...): A separate line of work that lets the Flask server run at the same time as the bot.daemon=True: Makes Flask shut down along with the main program (the bot). Without it, Flask keeps running even after you stop the bot, and your terminal won't close.use_reloader=False: Turns off Flask's auto-restart feature. This feature only works in the main thread, so leaving it on causes an error inside a thread. (See Common Error #1!)- Watch the order :
bot.run()must stay in the main thread because of signal handling. That's why we move Flask into a thread instead.
📌 Step 3 - Building a Bot Status API + Dashboard Page
Now let's build an API that returns the bot's info as JSON, plus an HTML page that fetches it every 5 seconds and displays it.
from flask import jsonify

@app.route("/api/stats")
def stats():
    return jsonify({
        "online": bot.is_ready(),
        "name": str(bot.user) if bot.user else "Connecting...",
        "servers": len(bot.guilds),
        "members": sum(g.member_count or 0 for g in bot.guilds),
        "ping_ms": round(bot.latency * 1000) if bot.is_ready() else None,
    })
Let's break it down 💡
jsonify(...): Turns a Python dictionary into a JSON response the browser can read.bot.is_ready(): Whether the bot has fully logged in to Discord. We use it for the online/offline indicator on the dashboard.bot.guilds: The list of servers the bot is in. Count them withlen()to get the server count.g.member_count: The member count of each server. You can read it with the default intents (no separate members intent needed).bot.latency: The response delay between your bot and Discord. It's a float in seconds, so we multiply it by ×1000 to convert it to ms. Before login it has no value (nan), so we filter it out first withis_ready().
The dashboard screen (HTML) is included in the full code. It's a simple setup that calls /api/stats with fetch() every 5 seconds and updates the numbers.
📌 Full Code (Copy & Paste OK)
# discord.py 2.7.x / Flask 3.1.x / Python 3.9+
import threading

import discord
from discord.ext import commands
from flask import Flask, jsonify, render_template_string

intents = discord.Intents.default()
bot = commands.Bot(command_prefix="!", intents=intents)
app = Flask(__name__)

PAGE = """
<!DOCTYPE html>
<html lang="ko">
<head>
<meta charset="utf-8">
<meta name="viewport" content="width=device-width, initial-scale=1">
<title>Bot Dashboard</title>
<style>
  body { font-family: sans-serif; background: #313338; color: #fff;
         display: flex; flex-direction: column; align-items: center; }
  h1 { margin-top: 40px; }
  .cards { display: flex; gap: 16px; flex-wrap: wrap; justify-content: center; }
  .card { background: #2b2d31; border-radius: 12px; padding: 24px 32px;
          text-align: center; min-width: 140px; }
  .card .num { font-size: 32px; font-weight: bold; color: #5865f2; }
  .on  { color: #23a55a; }
  .off { color: #f23f43; }
</style>
</head>
<body>
  <h1>🤖 <span id="name">Loading...</span></h1>
  <p id="status" class="off">● Checking</p>
  <div class="cards">
    <div class="card"><div class="num" id="servers">-</div>Servers</div>
    <div class="card"><div class="num" id="members">-</div>Users</div>
    <div class="card"><div class="num" id="ping">-</div>Ping (ms)</div>
  </div>
  <script>
    async function refresh() {
      const res = await fetch("/api/stats");
      const d = await res.json();
      document.getElementById("name").textContent = d.name;
      const s = document.getElementById("status");
      s.textContent = d.online ? "● Online" : "● Offline";
      s.className = d.online ? "on" : "off";
      document.getElementById("servers").textContent = d.servers;
      document.getElementById("members").textContent = d.members;
      document.getElementById("ping").textContent = d.ping_ms ?? "-";
    }
    refresh();
    setInterval(refresh, 5000);  // Auto-refresh every 5 seconds
  </script>
</body>
</html>
"""

@app.route("/")
def dashboard():
    return render_template_string(PAGE)

@app.route("/api/stats")
def stats():
    return jsonify({
        "online": bot.is_ready(),
        "name": str(bot.user) if bot.user else "Connecting...",
        "servers": len(bot.guilds),
        "members": sum(g.member_count or 0 for g in bot.guilds),
        "ping_ms": round(bot.latency * 1000) if bot.is_ready() else None,
    })

def run_flask():
    app.run(host="0.0.0.0", port=5000, use_reloader=False)

@bot.event
async def on_ready():
    print(f"{bot.user} logged in!")
    print("Dashboard: http://localhost:5000")

threading.Thread(target=run_flask, daemon=True).start()
bot.run("Put your bot token here")
📌 Result
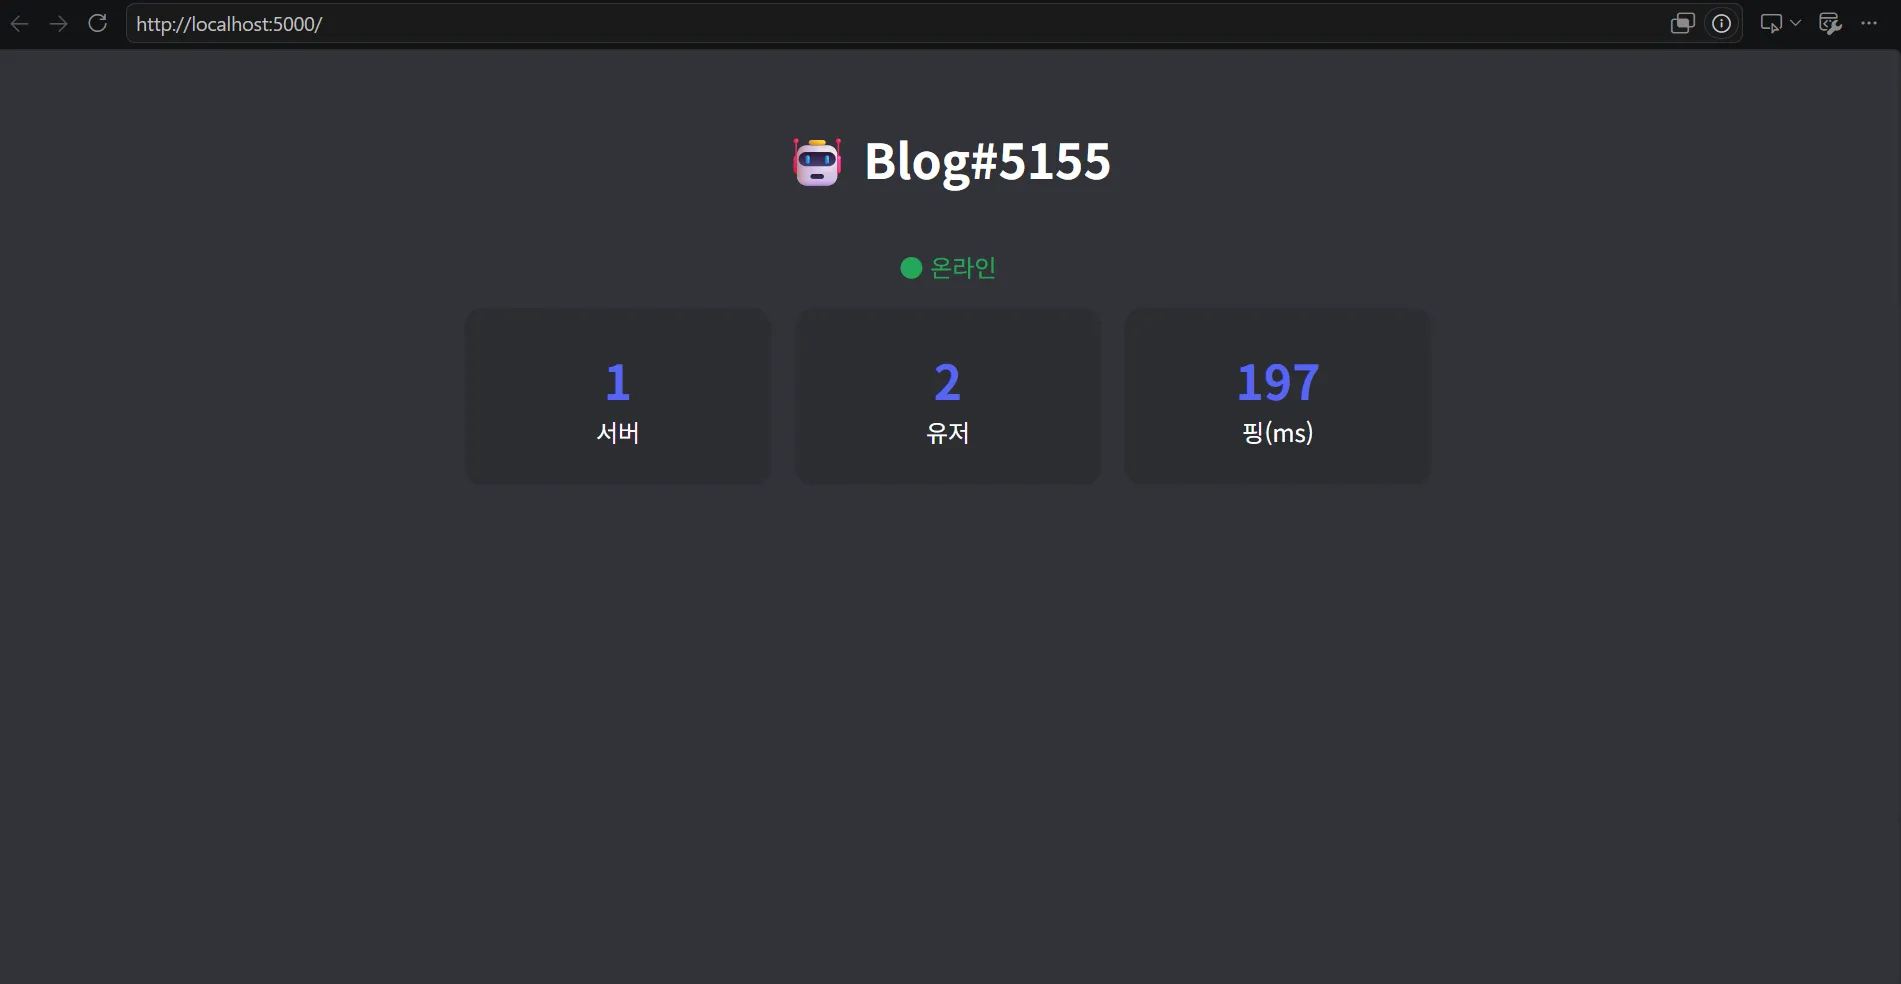
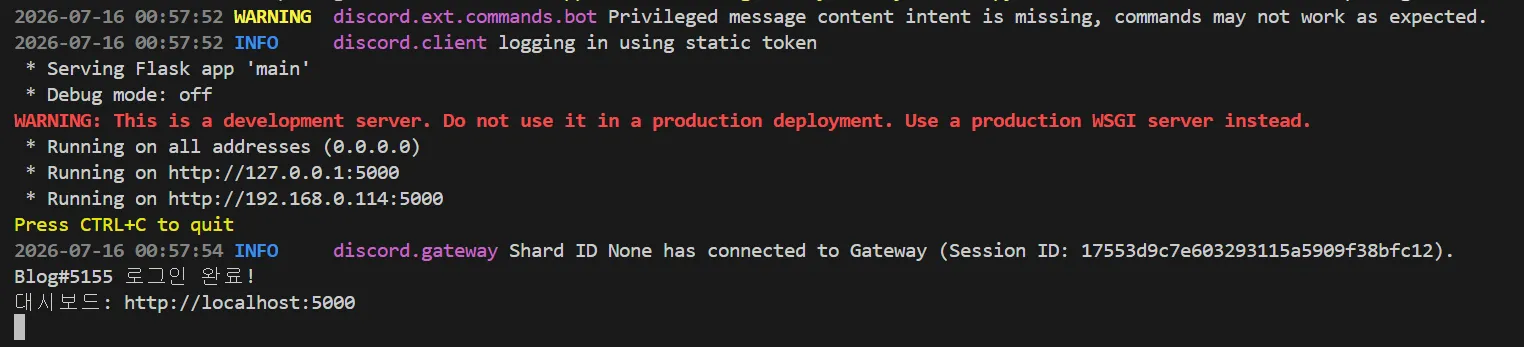
When you run the bot, the terminal prints a login message and the dashboard address. Open http://localhost:5000 in your browser and...
- You'll see the bot's name and a green ● Online light
- The server count / user count / ping (ms) show up as cards and refresh automatically every 5 seconds
- If the bot goes down (while only the dashboard is still running), it switches to a red ● Offline
- Connect to
http://내컴퓨터IP:5000(your computer's IP) from a phone on the same Wi-Fi, and you can check it on your phone too!
📌 Common Errors
- ValueError: signal only works in main thread
Cause: You ran Flask in a thread with debug mode (auto-restart) turned on, or the other way around, you sent
bot.run()to a thread. If either one isn't in the main thread, it blows up during signal handling. Fix: Always includeapp.run(..., use_reloader=False), and keep the bot in the main thread / Flask in a thread structure. - OSError: [Errno 98] Address already in use (Windows: WinError 10048)
Cause: Another program (or a previous run that never fully exited) is already using port 5000.
Fix: Switch to a different port like
port=5001, or close the terminal completely and run it again. - The dashboard shows 0 servers and 0 users Cause: The bot is still logging in, or it hasn't been invited to any server yet. Fix: Wait a moment and refresh (it also auto-refreshes every 5 seconds). If it stays at 0, check that the bot was actually invited to your test server with the bot invite link.
📌 Wrapping Up
Today we ran Flask in a separate thread so the bot and a web server run at the same time in one file, and built a real-time web dashboard that shows the bot's status, server count, and ping. Add command usage stats or recent logs, and you can grow it into a real admin page!
In the next part, we'll cover cooldowns and permission management to stop people from spamming commands. Stay tuned 🙌
📚 Discord Bot Tutorial Series
- Discord Bot Tutorial - Mastering Slash Commands!
- Discord Bot Tutorial #2 - Adding Options (Arguments) to Slash Commands!
- Discord Bot Tutorial #3 - Adding Subcommands to Slash Commands!
- Discord Bot Tutorial #4 - Sending Embeds with Slash Commands!
- Discord Bot Tutorial #5 - Implementing Button Interactions
- Discord Bot Tutorial #6 - Implementing a Dropdown (Select Menu)
- Discord Bot Tutorial #7 - Getting User Input with a Modal
- Discord Bot Tutorial #8 - Styling Embeds with Images and Fields
- Discord Bot Tutorial #9 - Connecting AI (Claude & ChatGPT API)
- Discord Bot Tutorial #10 - Adding Multi-Language (i18n) Support
- Discord Bot Tutorial #11 - Building a Web Dashboard with Flask ← You are here!
Series · Part 11 of 32
Discord Bot Tutorial
- #1Discord Bot Tutorial - Mastering Slash Commands!
- #2Adding Options (Arguments) to Slash Commands!
- #3Adding Subcommands to Slash Commands!
- #4Sending Embeds with Slash Commands!
- #5Implementing Button Interactions!
- #6Implementing a Dropdown (Select Menu)!
- #7Getting User Input with a Modal (Python Example)
- #8Styling Embeds with Images and Fields (Python Example)
- #9Connecting AI (Claude & ChatGPT API) to Your Bot! (Python Example)
- #10Adding Multi-Language (i18n) Support! (Python Example)
- #11Building a Web Dashboard with Flask! (Python Example)You are here
- #12Managing Command Cooldowns and Permissions! (Python Example)
- #13Automating Roles and Channels to Manage Your Server! (Python Example)
- #14Saving Data! JSON vs SQLite (Python Example)
- #15슬래시 명령어 그룹(Group)으로 명령어 정리하기! (파이썬 예제) (Korean)
- #16리마인더·알림 기능 만들기! 봇이 먼저 말 걸게 하기 (파이썬 예제) (Korean)
- #17RAG로 문서 기반 답변봇 만들기! 우리 서버 전용 FAQ 봇 (파이썬 예제) (Korean)
- #18투표(Poll) 기능 만들기! 다수결로 정하는 서버 규칙 (파이썬 예제) (Korean)
- #19Cog로 코드 쪼개기! 1000줄 봇도 안 더러워지는 구조 (파이썬 예제) (Korean)
- #20자동 환영 메시지·온보딩 만들기! 규칙 동의 버튼으로 자동 역할 부여 (파이썬 예제) (Korean)
- #21키워드 자동응답·금지어 필터 만들기! 경고 누적으로 자동 제재까지 (파이썬 예제) (Korean)
- #22슬래시 명령어 자동완성(Autocomplete) 만들기! 금지어를 골라서 추가·삭제 (파이썬 예제) (Korean)
- #23aiosqlite로 비동기 DB 제대로 설계하기! JSON 탈출 (파이썬 예제) (Korean)
- #24채널 난독화(Channel Obfuscation) 대응하기! 11/16부터 안 보이는 채널이 생겨요 (파이썬 예제) (Korean)
- #25봇이 죽지 않게! 에러 핸들링·로깅 체계 잡기 (파이썬 예제) (Korean)
- #26티켓(Ticket) 문의 시스템 만들기! 버튼 하나로 1:1 상담 채널 자동 생성 (파이썬 예제) (Korean)
- #27티켓 담당자 배정·우선순위 만들기! 스태프가 여러 명이어도 안 꼬이게 (파이썬 예제) (Korean)
- #28레벨·경험치(XP) 시스템 만들기! 채팅할수록 레벨업, 랭킹판까지 (파이썬 예제) (Korean)
- #29화폐·상점(Economy) 시스템 만들기! 코인 벌어서 아이템 사기 (파이썬 예제) (Korean)
- #30Build a Poll & Survey Bot! Native Polls + Buttons with Real-Time Tallies (Python Example) 🗳️
- #32Build a Server Log & Audit Log Channel! Auto-Log Message Deletes, Edits, Joins/Leaves, and Kicks (Python Example) 🕵️
- #33임시 음성방 확장, 파티방 만들기! 방장 위임·강퇴·초대 전용(비공개) 방 + 전용 채팅방 자동 생성 (파이썬 예제) 🎉 (Korean)
Show all 32Collapse
