
Category: Discord Bot Tutorials
Discord Bot Tutorial#10Adding Multi-Language (i18n) Support! (Python Example)
 Author: Mojangcam
This post was translated from the Korean original.
Contents10 sections
Hi there! This is Mojangcam 😎
In Part #9, we connected AI (Claude & ChatGPT API) to our bot and built a bot you can chat with, right? This time, we're upgrading our bot into a global bot. That's right: multi-language (i18n) support!
If you run a game server with players from other countries, a bot that only answers in Korean can feel a bit limiting. Every Discord user has their own client language setting, and if you read it, you can build a bot that automatically replies in Korean to Korean users and in English to international users. You can even show slash command names and descriptions differently for each language!
🧠 What Is i18n, and Why Do You Need It?
i18n is short for internationalization. There are 18 letters between the i and the n, so people call it i18n 💡
There are more moments than you'd think when a Discord bot needs i18n.
- A guide bot for a game server (Minecraft, ARK, etc.) with players from other countries
- A public bot that gets added to servers in many countries
- When you want to lower the barrier to entry by showing command descriptions in the user's language
discord.py already has this built in. You only need to know two things: interaction.locale (the user's language) and Translator (the command translator)!
📌 What You Need
- Python 3.8 or later
- discord.py 2.x (this post is based on the latest version, 2.7.1)
- A bot token + a test server your bot has been invited to (see Part #1)
pip install -U discord.py📌 Step 1 - Finding Out the User's Language (interaction.locale)
When a slash command runs, Discord sends that user's language info along with it. First, let's check what value comes in.
@bot.tree.command(name="lang", description="Check my language setting")
async def lang(interaction: discord.Interaction):
    await interaction.response.send_message(
        f"Client language: {interaction.locale}"
    )
Let's break it down 💡
- interaction.locale : This is the Discord app language setting of the user who ran the command. A Korean client sends
ko, English (US) sendsen-US, and Japanese sendsja. - interaction.guild_locale : This one isn't the user's language but the server (guild) default language. It's handy for server-wide messages like announcements.
- The return type is an enum called
discord.Locale, and wrapping it instr()turns it into a string like'ko'.
📌 Step 2 - Switching Reply Messages with a Translation Dictionary
Now let's make a translation dictionary (dict) that holds a reply for each language, then pick the message that matches interaction.locale and send it.
RESPONSES = {
    "ko": "안녕하세요, {user}님! 만나서 반가워요 🙌",
    "ja": "こんにちは、{user}さん!",
    "en-US": "Hello, {user}! Nice to meet you 🙌",
}
DEFAULT_LOCALE = "en-US"

@bot.tree.command(name="hello", description="Send a friendly greeting")
async def hello(interaction: discord.Interaction):
    lang = str(interaction.locale)
    template = RESPONSES.get(lang, RESPONSES[DEFAULT_LOCALE])
    await interaction.response.send_message(
        template.format(user=interaction.user.display_name)
    )
Let's break it down 💡
- RESPONSES : A translation dictionary that uses language codes as keys. If you want to add a language, just add one more line here.
- RESPONSES.get(lang, default) : If a user comes in with a language that isn't in the dictionary (for example, French
fr), the bot replies in the default language (English) instead. This is the key safety net for multi-language handling! - {user} + format() : A placeholder that lets you slot variables like the user's nickname into the message.
📌 Step 3 - Translating Command Names and Descriptions Too (Translator)
Changing only the replies gets you halfway there. Wouldn't it be nicer if Korean users saw the command itself as /인사? That's what app_commands.Translator is for.
from discord import app_commands
from discord.app_commands import locale_str as _T

COMMAND_I18N = {
    "ko": {
        "hello": "인사",
        "Send a friendly greeting": "봇이 반갑게 인사를 건네요",
    },
    "ja": {
        "hello": "あいさつ",
        "Send a friendly greeting": "ボットがあいさつします",
    },
}

class MyTranslator(app_commands.Translator):
    async def translate(self, string, locale, context):
        # Return the translation if there is one, otherwise None (keeps the original)
        return COMMAND_I18N.get(str(locale), {}).get(string.message)
Let's break it down 💡
- locale_str (_T) : A marker that says "this string should be translated." When you create a command, you wrap it like
name=_T("hello"). - Translator : When you register (sync) commands to the server, discord.py calls
translate()for every language Discord supports. If there's no translation, returnNoneand the original text is used as is. - string.message : The original string you wrapped with
_T(). You use it as the key to look things up in the translation dictionary. - ⚠️ The command name rules apply to translations too. No spaces, and English letters must be lowercase! (Korean and Japanese are fine as they are)
Finally, register the translator before sync when the bot starts up.
@bot.event
async def on_ready():
    await bot.tree.set_translator(MyTranslator())  # Must come before sync!
    await bot.tree.sync()
    print(f"{bot.user} logged in!")
📌 Full Code (Copy & Paste OK)
# discord.py 2.7.x / Python 3.8+
from typing import Optional

import discord
from discord import app_commands
from discord.app_commands import locale_str as _T
from discord.ext import commands

intents = discord.Intents.default()
bot = commands.Bot(command_prefix="!", intents=intents)

# Command name/description translations (used by Translator)
COMMAND_I18N = {
    "ko": {
        "hello": "인사",
        "Send a friendly greeting": "봇이 반갑게 인사를 건네요",
    },
    "ja": {
        "hello": "あいさつ",
        "Send a friendly greeting": "ボットがあいさつします",
    },
}

# Reply message translations (picked by interaction.locale)
RESPONSES = {
    "ko": "안녕하세요, {user}님! 만나서 반가워요 🙌",
    "ja": "こんにちは、{user}さん!",
    "en-US": "Hello, {user}! Nice to meet you 🙌",
}
DEFAULT_LOCALE = "en-US"

class MyTranslator(app_commands.Translator):
    async def translate(
        self,
        string: app_commands.locale_str,
        locale: discord.Locale,
        context: app_commands.TranslationContext,
    ) -> Optional[str]:
        return COMMAND_I18N.get(str(locale), {}).get(string.message)

@bot.tree.command(name=_T("hello"), description=_T("Send a friendly greeting"))
async def hello(interaction: discord.Interaction):
    lang = str(interaction.locale)  # e.g. 'ko', 'ja', 'en-US'
    template = RESPONSES.get(lang, RESPONSES[DEFAULT_LOCALE])
    await interaction.response.send_message(
        template.format(user=interaction.user.display_name)
    )

@bot.event
async def on_ready():
    await bot.tree.set_translator(MyTranslator())  # Must come before sync!
    await bot.tree.sync()
    print(f"{bot.user} logged in!")

bot.run("Put your bot token here")
📌 Result
Start the bot and try typing the command...
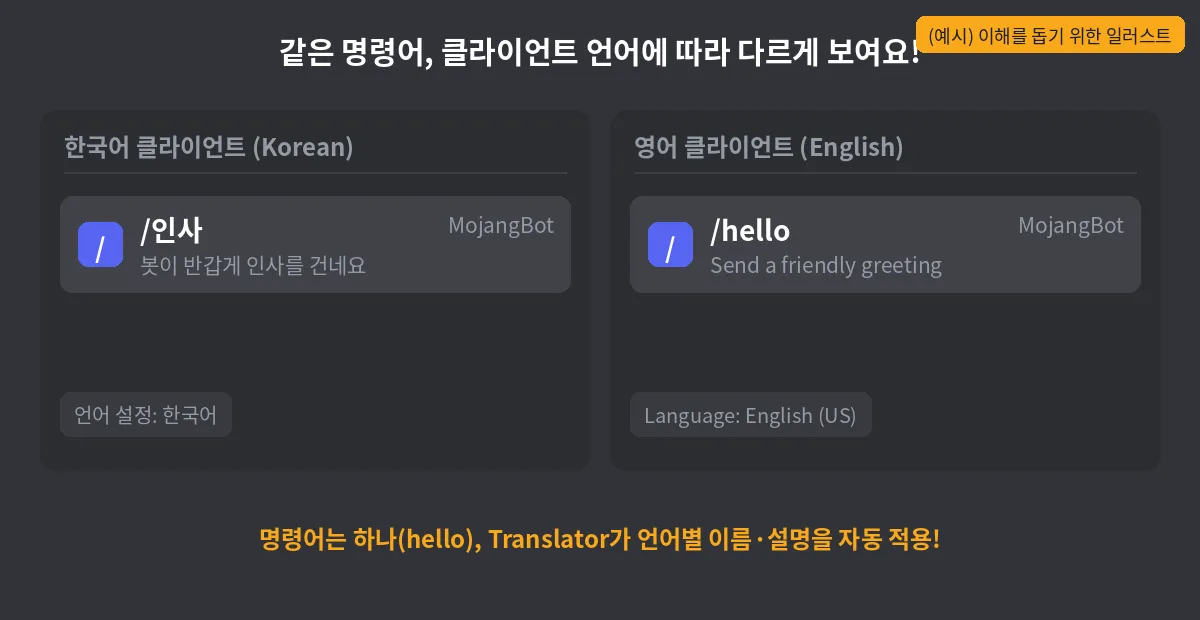
- Korean client: it shows up in the command list as /인사 - 봇이 반갑게 인사를 건네요 ("/greet - The bot greets you warmly"), and running it replies "안녕하세요, ○○님! 만나서 반가워요 🙌" ("Hello, ○○! Nice to meet you 🙌")
- English client: it shows up as /hello - Send a friendly greeting, and replies "Hello, ○○! Nice to meet you 🙌"
- Japanese client: it shows up as /あいさつ! It's the same command, but it looks completely different in each language.
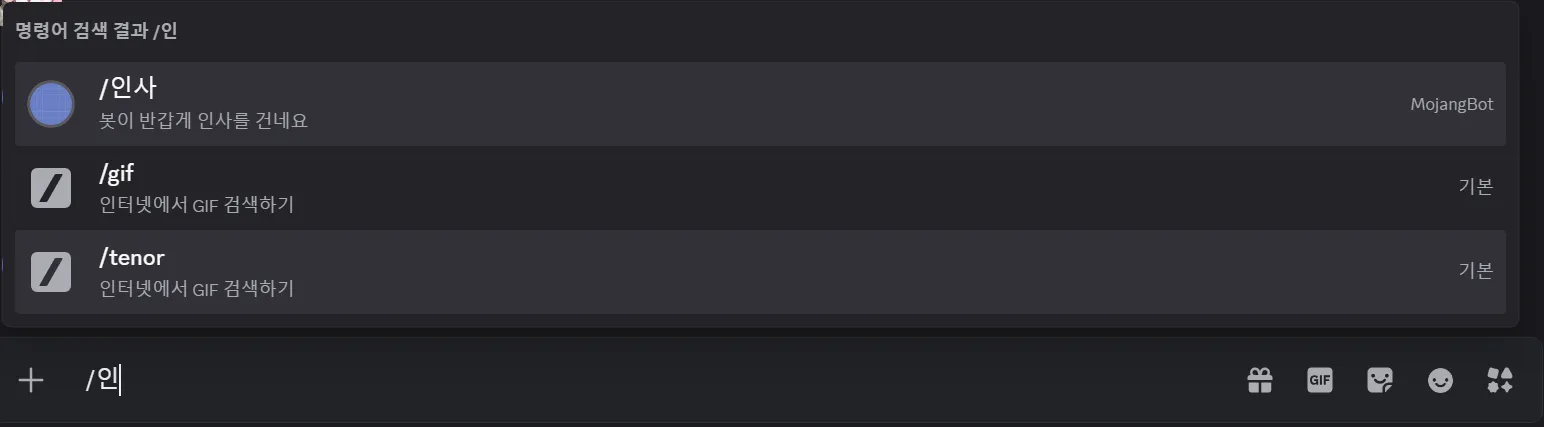
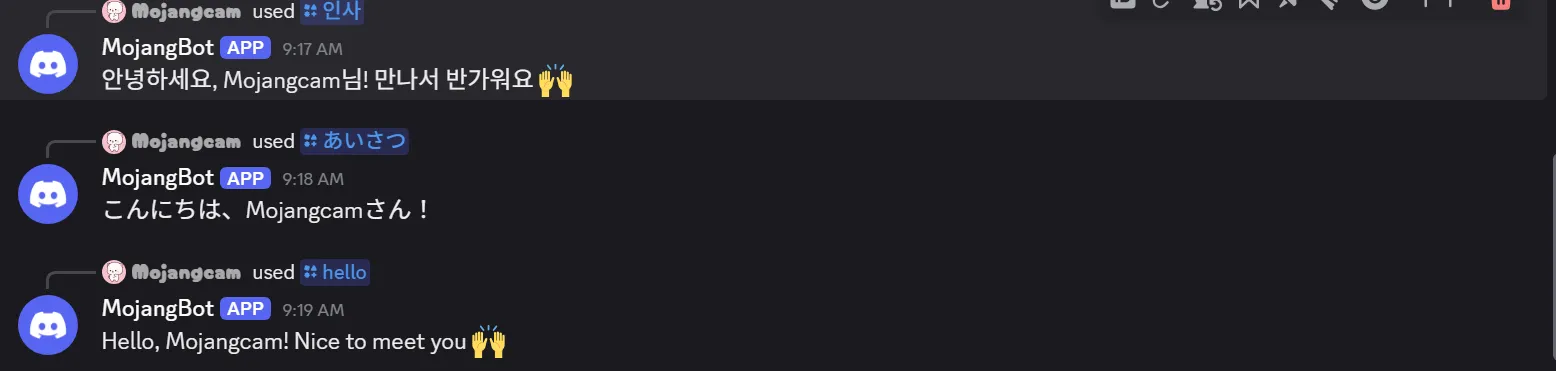
Also try running it in a language that isn't in the translation dictionary (French, etc.) and check that it replies in the default, English!
📌 Common Errors
- The command name isn't translated and only shows in English
Cause: You called
set_translator()aftersync(), or you didn't re-sync after registering the translator. Translations are applied at sync time. Fix: Keep the orderawait bot.tree.set_translator(...)→await bot.tree.sync(), and refresh your Discord client with Ctrl+R. It can take a few minutes to show up. - I get a 400 Bad Request (CommandSyncFailure) error during sync Cause: A translated command name breaks Discord's rules. Command names can't contain spaces, and uppercase English letters aren't allowed either. Fix: Check the command name entries in your translation dictionary. "인사 하기" (with a space ❌) → "인사하기" (⭕), "Hello" (uppercase ❌) → "hello" (⭕)
- interaction.locale always comes back as en-US
Cause:
localeisn't based on the server language but on each user's Discord app language setting. If your app is set to English, en-US is the correct value. Fix: Go to Discord Settings → Language, switch to Korean, and test again. If you need the server's language, useinteraction.guild_localeinstead.
📌 Wrapping Up
Today we built a 3-step multi-language bot: reading the user's language with interaction.locale, switching replies with a translation dictionary, and translating command names and descriptions with Translator. Just add one line per language to the translation dictionary and you can support any language, so go ahead and extend it to fit your own server!
In the next part, we'll cover cooldowns and permission management to stop people from spamming commands. Stay tuned 🙌
📚 Discord Bot Tutorial Series
- Discord Bot Tutorial - Mastering Slash Commands!
- Discord Bot Tutorial #2 - Adding Options (Arguments) to Slash Commands!
- Discord Bot Tutorial #3 - Adding Subcommands to Slash Commands!
- Discord Bot Tutorial #4 - Sending Embeds with Slash Commands!
- Discord Bot Tutorial #5 - Implementing Button Interactions
- Discord Bot Tutorial #6 - Implementing a Dropdown (Select Menu)
- Discord Bot Tutorial #7 - Getting User Input with a Modal
- Discord Bot Tutorial #8 - Styling Embeds with Images and Fields
- Discord Bot Tutorial #9 - Connecting AI (Claude & ChatGPT API)
- Discord Bot Tutorial #10 - Adding Multi-Language (i18n) Support ← You are here!
Series · Part 10 of 32
Discord Bot Tutorial
- #1Discord Bot Tutorial - Mastering Slash Commands!
- #2Adding Options (Arguments) to Slash Commands!
- #3Adding Subcommands to Slash Commands!
- #4Sending Embeds with Slash Commands!
- #5Implementing Button Interactions!
- #6Implementing a Dropdown (Select Menu)!
- #7Getting User Input with a Modal (Python Example)
- #8Styling Embeds with Images and Fields (Python Example)
- #9Connecting AI (Claude & ChatGPT API) to Your Bot! (Python Example)
- #10Adding Multi-Language (i18n) Support! (Python Example)You are here
- #11Building a Web Dashboard with Flask! (Python Example)
- #12Managing Command Cooldowns and Permissions! (Python Example)
- #13Automating Roles and Channels to Manage Your Server! (Python Example)
- #14Saving Data! JSON vs SQLite (Python Example)
- #15슬래시 명령어 그룹(Group)으로 명령어 정리하기! (파이썬 예제) (Korean)
- #16리마인더·알림 기능 만들기! 봇이 먼저 말 걸게 하기 (파이썬 예제) (Korean)
- #17RAG로 문서 기반 답변봇 만들기! 우리 서버 전용 FAQ 봇 (파이썬 예제) (Korean)
- #18투표(Poll) 기능 만들기! 다수결로 정하는 서버 규칙 (파이썬 예제) (Korean)
- #19Cog로 코드 쪼개기! 1000줄 봇도 안 더러워지는 구조 (파이썬 예제) (Korean)
- #20자동 환영 메시지·온보딩 만들기! 규칙 동의 버튼으로 자동 역할 부여 (파이썬 예제) (Korean)
- #21키워드 자동응답·금지어 필터 만들기! 경고 누적으로 자동 제재까지 (파이썬 예제) (Korean)
- #22슬래시 명령어 자동완성(Autocomplete) 만들기! 금지어를 골라서 추가·삭제 (파이썬 예제) (Korean)
- #23aiosqlite로 비동기 DB 제대로 설계하기! JSON 탈출 (파이썬 예제) (Korean)
- #24채널 난독화(Channel Obfuscation) 대응하기! 11/16부터 안 보이는 채널이 생겨요 (파이썬 예제) (Korean)
- #25봇이 죽지 않게! 에러 핸들링·로깅 체계 잡기 (파이썬 예제) (Korean)
- #26티켓(Ticket) 문의 시스템 만들기! 버튼 하나로 1:1 상담 채널 자동 생성 (파이썬 예제) (Korean)
- #27티켓 담당자 배정·우선순위 만들기! 스태프가 여러 명이어도 안 꼬이게 (파이썬 예제) (Korean)
- #28레벨·경험치(XP) 시스템 만들기! 채팅할수록 레벨업, 랭킹판까지 (파이썬 예제) (Korean)
- #29화폐·상점(Economy) 시스템 만들기! 코인 벌어서 아이템 사기 (파이썬 예제) (Korean)
- #30Build a Poll & Survey Bot! Native Polls + Buttons with Real-Time Tallies (Python Example) 🗳️
- #32Build a Server Log & Audit Log Channel! Auto-Log Message Deletes, Edits, Joins/Leaves, and Kicks (Python Example) 🕵️
- #33임시 음성방 확장, 파티방 만들기! 방장 위임·강퇴·초대 전용(비공개) 방 + 전용 채팅방 자동 생성 (파이썬 예제) 🎉 (Korean)
Show all 32Collapse
